 Maintenance
Your Seasonal Lawn Clean Up Guide for a Healthier Yard
A lot of lawn clean up gets done in the wrong order.
People rake a bit, mow a bit, throw down fertilizer, and hope the yard sorts itself out. Then weeds come back, thin spots stay thin, and the lawn still looks rough a few weeks later. That approach wastes time and product.
That matters because homeowners already spend 70 hours per year maintaining their lawns on average, and nearly 50% say lawn care is their biggest home maintenance task, according to LawnStarter's lawn care and landscaping industry statistics. If you're going to spend that kind of time, your cleanup needs to do more than make the yard look tidy. It needs to set up better growth.
A good lawn clean up is not just raking leaves and hauling debris. It's the reset that makes mowing, watering, soil testing, and fertilizing effective.
Table of Contents
- When to Start Your Lawn Cleanup and What You'll Need
- The Core Lawn Cleanup Tasks in Order
- Handling Debris to Prevent Lawn Diseases
- Connecting Cleanup to Your Soil's Actual Needs
- Using MySoilPlan to Build Your Post-Cleanup Action Plan
When to Start Your Lawn Cleanup and What You'll Need
Timing matters more than most homeowners think.
If you clean up too early, you can stress grass that hasn't started growing yet. If you wait too long, debris mats down, weeds get a head start, and the job gets harder. Good lawn clean up starts when the yard is ready, not just when you're tired of looking at winter mess.
Start based on growth not the calendar
Spring and fall cleanups are different jobs.
In spring, you're waking the lawn up. The goal is to remove what blocks light, air, and water, then get the surface ready for active growth. Don't rush out on the first warm afternoon. Wait until the lawn is no longer soggy and the grass has clearly started growing.
In fall, you're putting the lawn away clean. That means removing leaves, sticks, and heavy surface clutter before cold, damp conditions let them sit and smother turf.
A simple rule works well:
- Cool-season grasses like fescue, ryegrass, and Kentucky bluegrass should get major cleanup when they're actively growing. That usually means early to mid spring and again in fall.
- Warm-season grasses like Bermuda, zoysia, and St. Augustine should get heavier spring cleanup a little later, once they've fully come out of dormancy and are pushing new growth.
Practical rule: If the lawn is still squishy underfoot, wait. Cleanup on wet soil causes ruts, compaction, and torn turf.
Don't overcomplicate it. You're looking for dry enough ground, visible growth, and a realistic weather window so the yard can recover after you disturb it.
Build a simple cleanup kit
Most homeowners don't need a trailer full of gear. They need the right few tools.
Here's a practical checklist:
- Flexible leaf rake for loose leaves and surface debris
- Stiff rake for tougher material in thin areas
- Lawn mower with a sharp blade
- String trimmer or edger for borders and hard-to-reach spots
- Leaf blower if you want to move debris fast before bagging
- Gloves and tarps for hauling material
- Weeding tool for obvious invaders during cleanup
- Dethatcher or power rake if the lawn has a thick spongy layer
- Core aerator if the soil is compacted
You do not need every machine every season.
Use this quick guide:
| Condition | What you need |
|---|---|
| Mostly leaves and twigs | Rake, mower, blower |
| Matted surface and spongy feel | Dethatcher or power rake |
| Hard soil and poor drainage | Core aerator |
| Overgrown edges and beds | Trimmer or edger |
If you only remember one thing, remember this: don't start your lawn clean up with products. Start with observation. Walk the yard first. Look for matted grass, standing debris, weeds, bare spots, compacted paths, and puddling areas. That walk saves you from doing random work.
The Core Lawn Cleanup Tasks in Order
The order matters.
Do these tasks out of sequence and you'll either miss problems or create extra work. Cleanups go faster when each step clears the way for the next one.
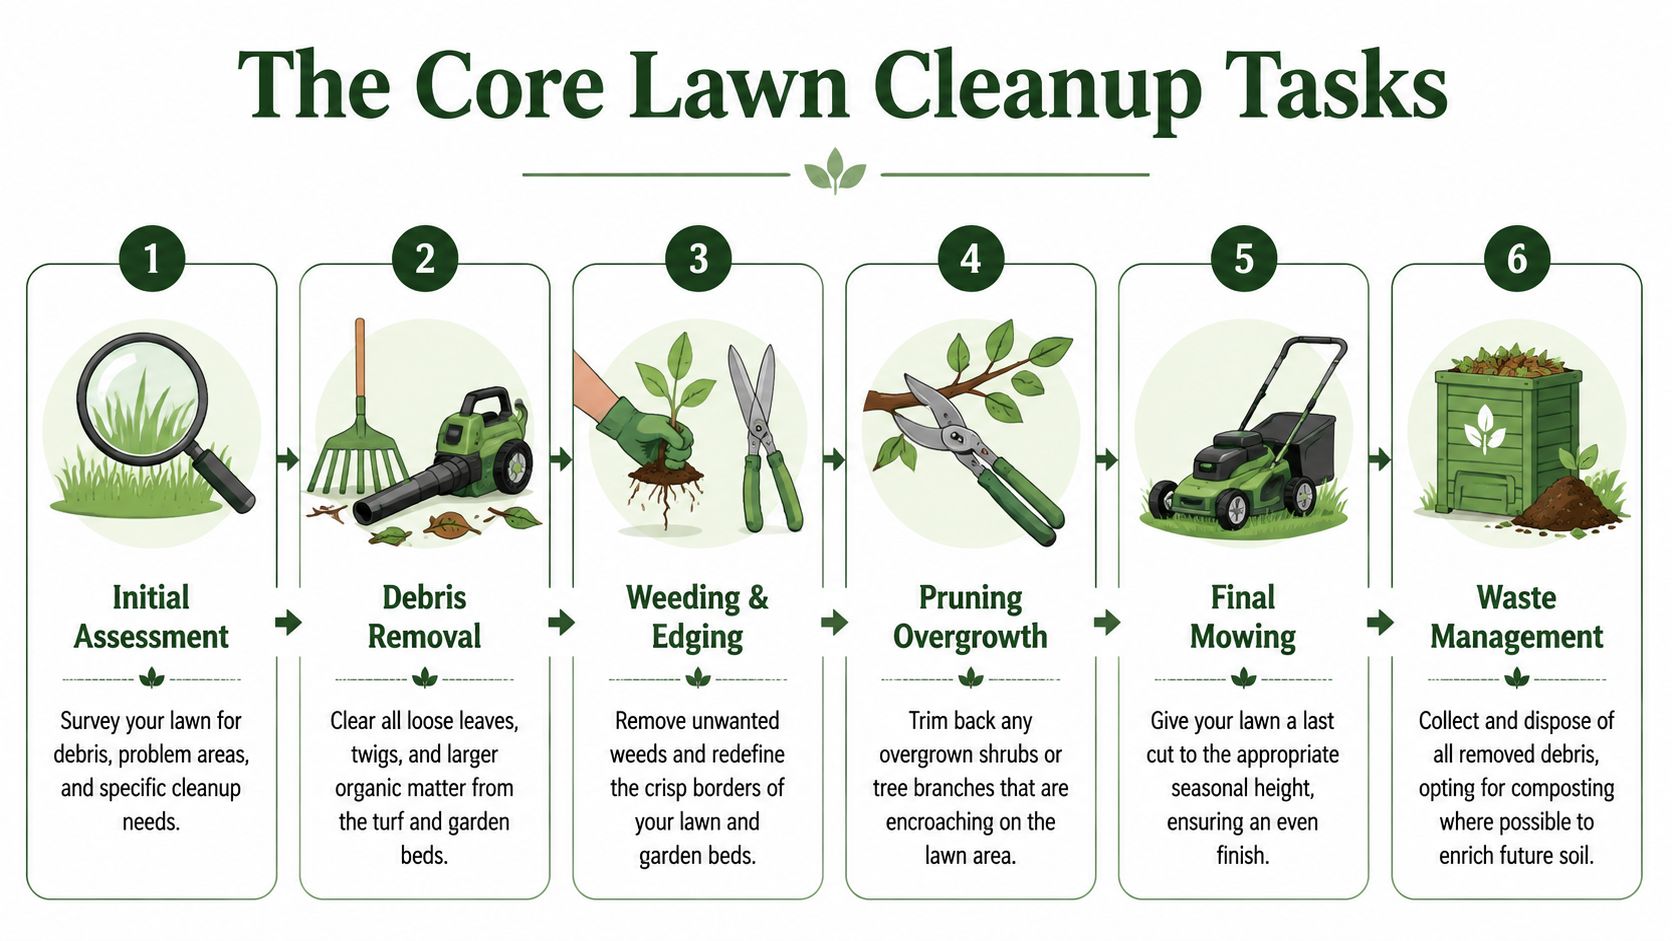
Use the right order or do the work twice
Start with the biggest mess first.
If branches, toys, pine cones, and heavy leaf piles are still on the lawn, don't mow. Pick those up first. Running a mower over bulky debris is hard on the machine and leaves a patchy finish.
Then move through the cleanup in this order:
- Inspect the lawn
- Remove large debris
- Weed and edge obvious problem areas
- Prune back overgrowth hanging into turf
- Mow
- Dethatch if needed
- Aerate if needed
- Collect and dispose of the remaining waste
That's the clean sequence. It keeps the surface visible and prevents one task from undoing another.
Mow before dethatching. Shorter grass lets the machine or rake reach the thatch layer instead of dragging through long blades.
What each step actually looks like
Initial assessment
Walk the full yard. Don't guess from the patio.
Look for low spots, dead patches, mossy zones, shallow tree roots, and compacted traffic lanes. Also note whether the lawn feels springy underfoot. That spongy feel usually means surface buildup.
Debris removal
Clear everything loose first. That includes leaves, twigs, seed pods, branches, and windblown trash.
Get debris off both turf and bed edges. Material trapped along fences, sidewalks, and foundation lines holds moisture and makes the yard look unfinished.
Weeding and edging
Pull or dig the obvious weeds while the lawn is open and easy to see. You won't get every weed in one pass, but removing the worst clumps now keeps them from setting the tone for the season.
Then edge the lawn. Sharp borders instantly make cleanup look more complete, even before the grass fully greens up.
Pruning overgrowth
Cut back branches and shrubs that hang low over the grass. Shaded, damp corners are trouble spots. If plants are crowding the lawn, open them up.
That improves airflow and reduces the amount of debris dropping onto the turf.
Final mowing
Use a sharp blade and avoid scalping. You're not trying to shave the lawn to dirt. You're trying to even it out and remove scraggly top growth.
Bag or mulch based on conditions. If clippings are light and dry, mulching is fine. If the lawn is shaggy and the clippings clump, collect them.
Dethatching
Dethatching means removing the thick, spongy layer of dead material between the green grass and the soil.
That layer causes real problems. A thick thatch layer acts as a physical barrier that prevents fertilizer and water from reaching the root zone, according to TaskEasy's spring cleanup guidance. If your lawn feels bouncy, water runs off instead of soaking in, or fertilizer never seems to help, thatch may be the reason.
Use a dethatcher or power rake on lawns that need it. Don't do it just because the machine is available. Aggressive dethatching on a lawn with little thatch can do more harm than good.
Aeration
Aeration means pulling small plugs of soil out of the lawn so water, air, and nutrients can move down to the roots.
Use core aeration on compacted lawns, especially in high-traffic areas. If you're not sure how often that job makes sense, this guide on how often you should aerate your lawn lays out the decision clearly.
Handling Debris to Prevent Lawn Diseases
A pile of leaves isn't just ugly. It can set you up for disease problems that show up later and look mysterious.
That's why sloppy lawn clean up in fall usually turns into frustrating repair work in spring.
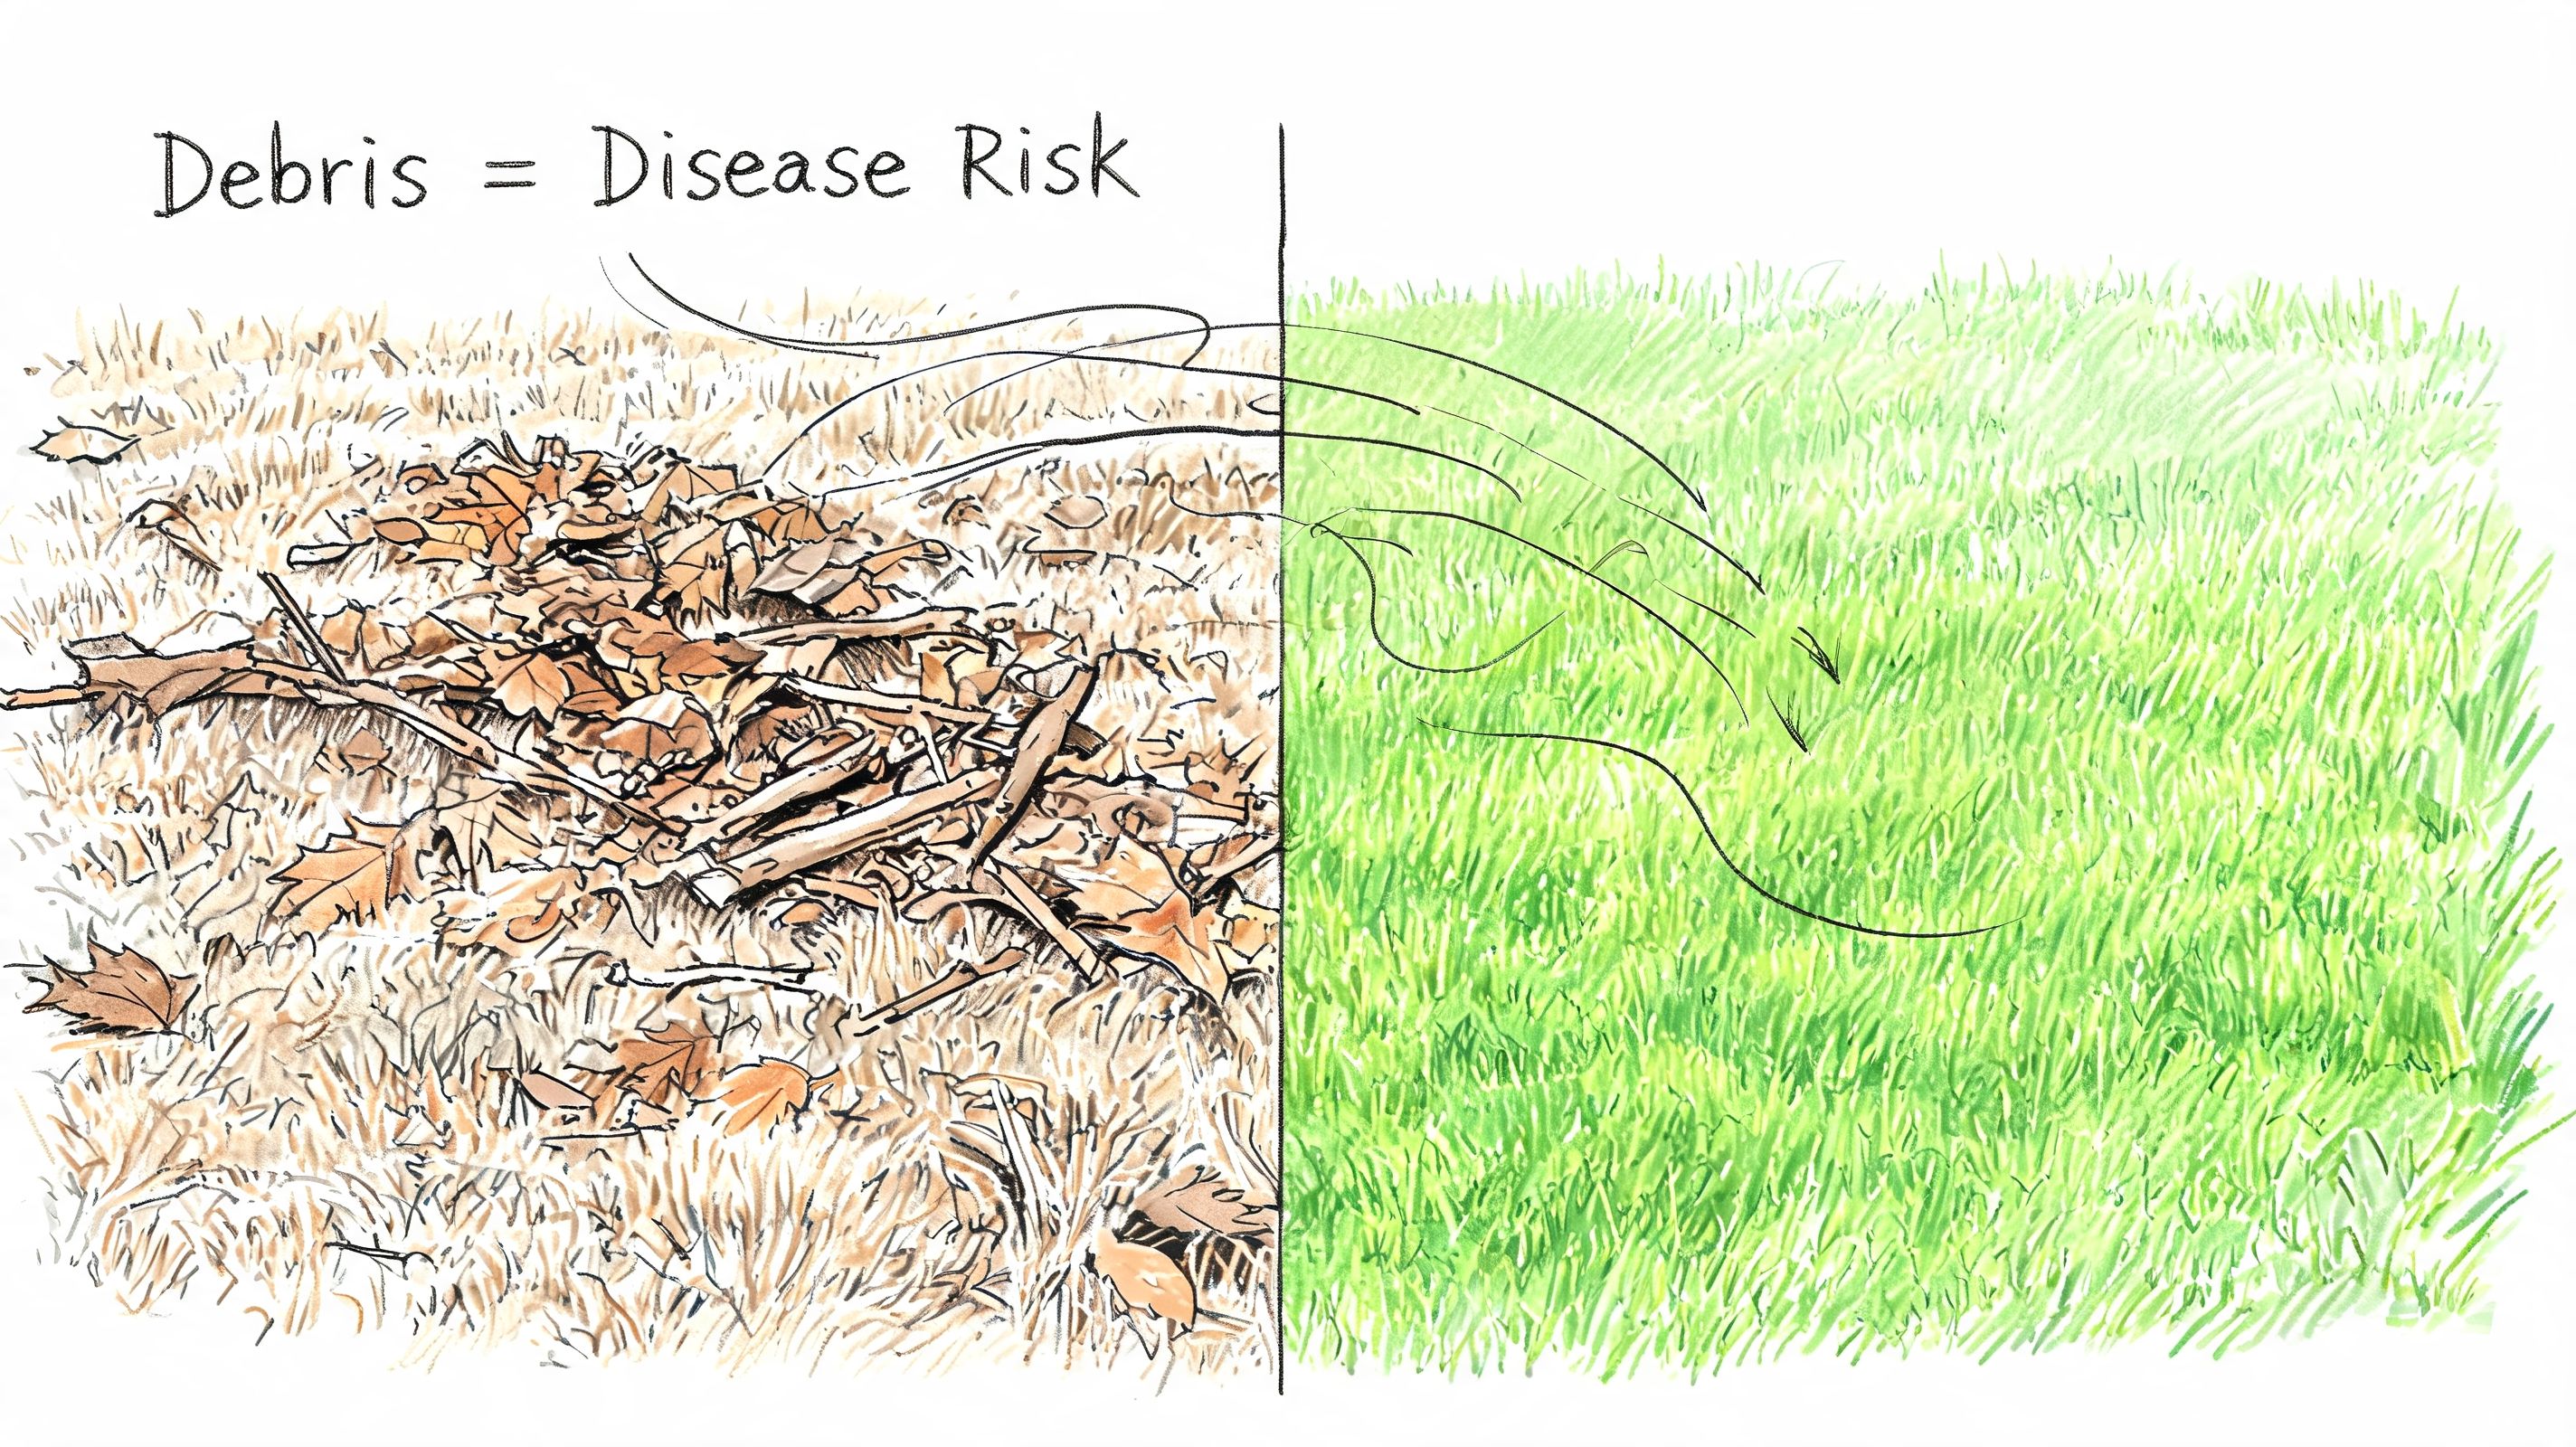
Wet debris is a lawn health problem
Leaves and organic debris left on turf over winter create a wet environment that promotes fungi like snow mold. Removing this debris is the principal way to eliminate the overwintering habitat for these pathogens, as explained in this fall yard cleanup article.
Here's what that means in plain English.
When leaves mat down, they trap moisture and block airflow. The grass underneath stays wet, cold, and starved of light. That's exactly the kind of environment lawn diseases like.
You don't always see the damage right away. Sometimes the lawn comes out of winter looking pale, matted, or patchy. Homeowners often blame fertilizer, weather, or bad seed. In many cases, the problem started with debris that should've been removed months earlier.
A clean fall surface gives you a better spring lawn. That's not cosmetic. That's prevention.
Be especially thorough in these spots:
- Along fences and walls where wind pushes leaves into piles
- Under trees where moisture lingers longer
- North-facing areas that dry slowly
- Low spots where wet debris settles and mats
- Around downspouts where water and leaf buildup combine
If you miss those areas, the yard may still look mostly clean from a distance, but the trouble spots remain.
What to do with the waste
You have two sensible options. Compost it, or remove it.
Compost when the material is clean
- Leaves, small clippings, and soft plant material can break down into useful organic matter.
- Keep diseased lawn material out of the pile if you're not sure it will heat up properly.
Bag or use municipal pickup when the material is heavy or questionable
- Use this for thick, matted leaves, weed seed heads, and debris from visibly unhealthy areas.
- If the material smells sour, feels slimy, or looks moldy, get it off the property.
A common mistake is shredding every leaf into the turf no matter how thick the layer is. Light leaf mulching can be fine. Wet mats are not. If you can't still see the grass clearly after mulching, there's too much material left behind.
Connecting Cleanup to Your Soil's Actual Needs
Physical cleanup is only half the job.
Once the lawn surface is open, you can finally deal with the reason many lawns keep struggling in the first place. The soil underneath.
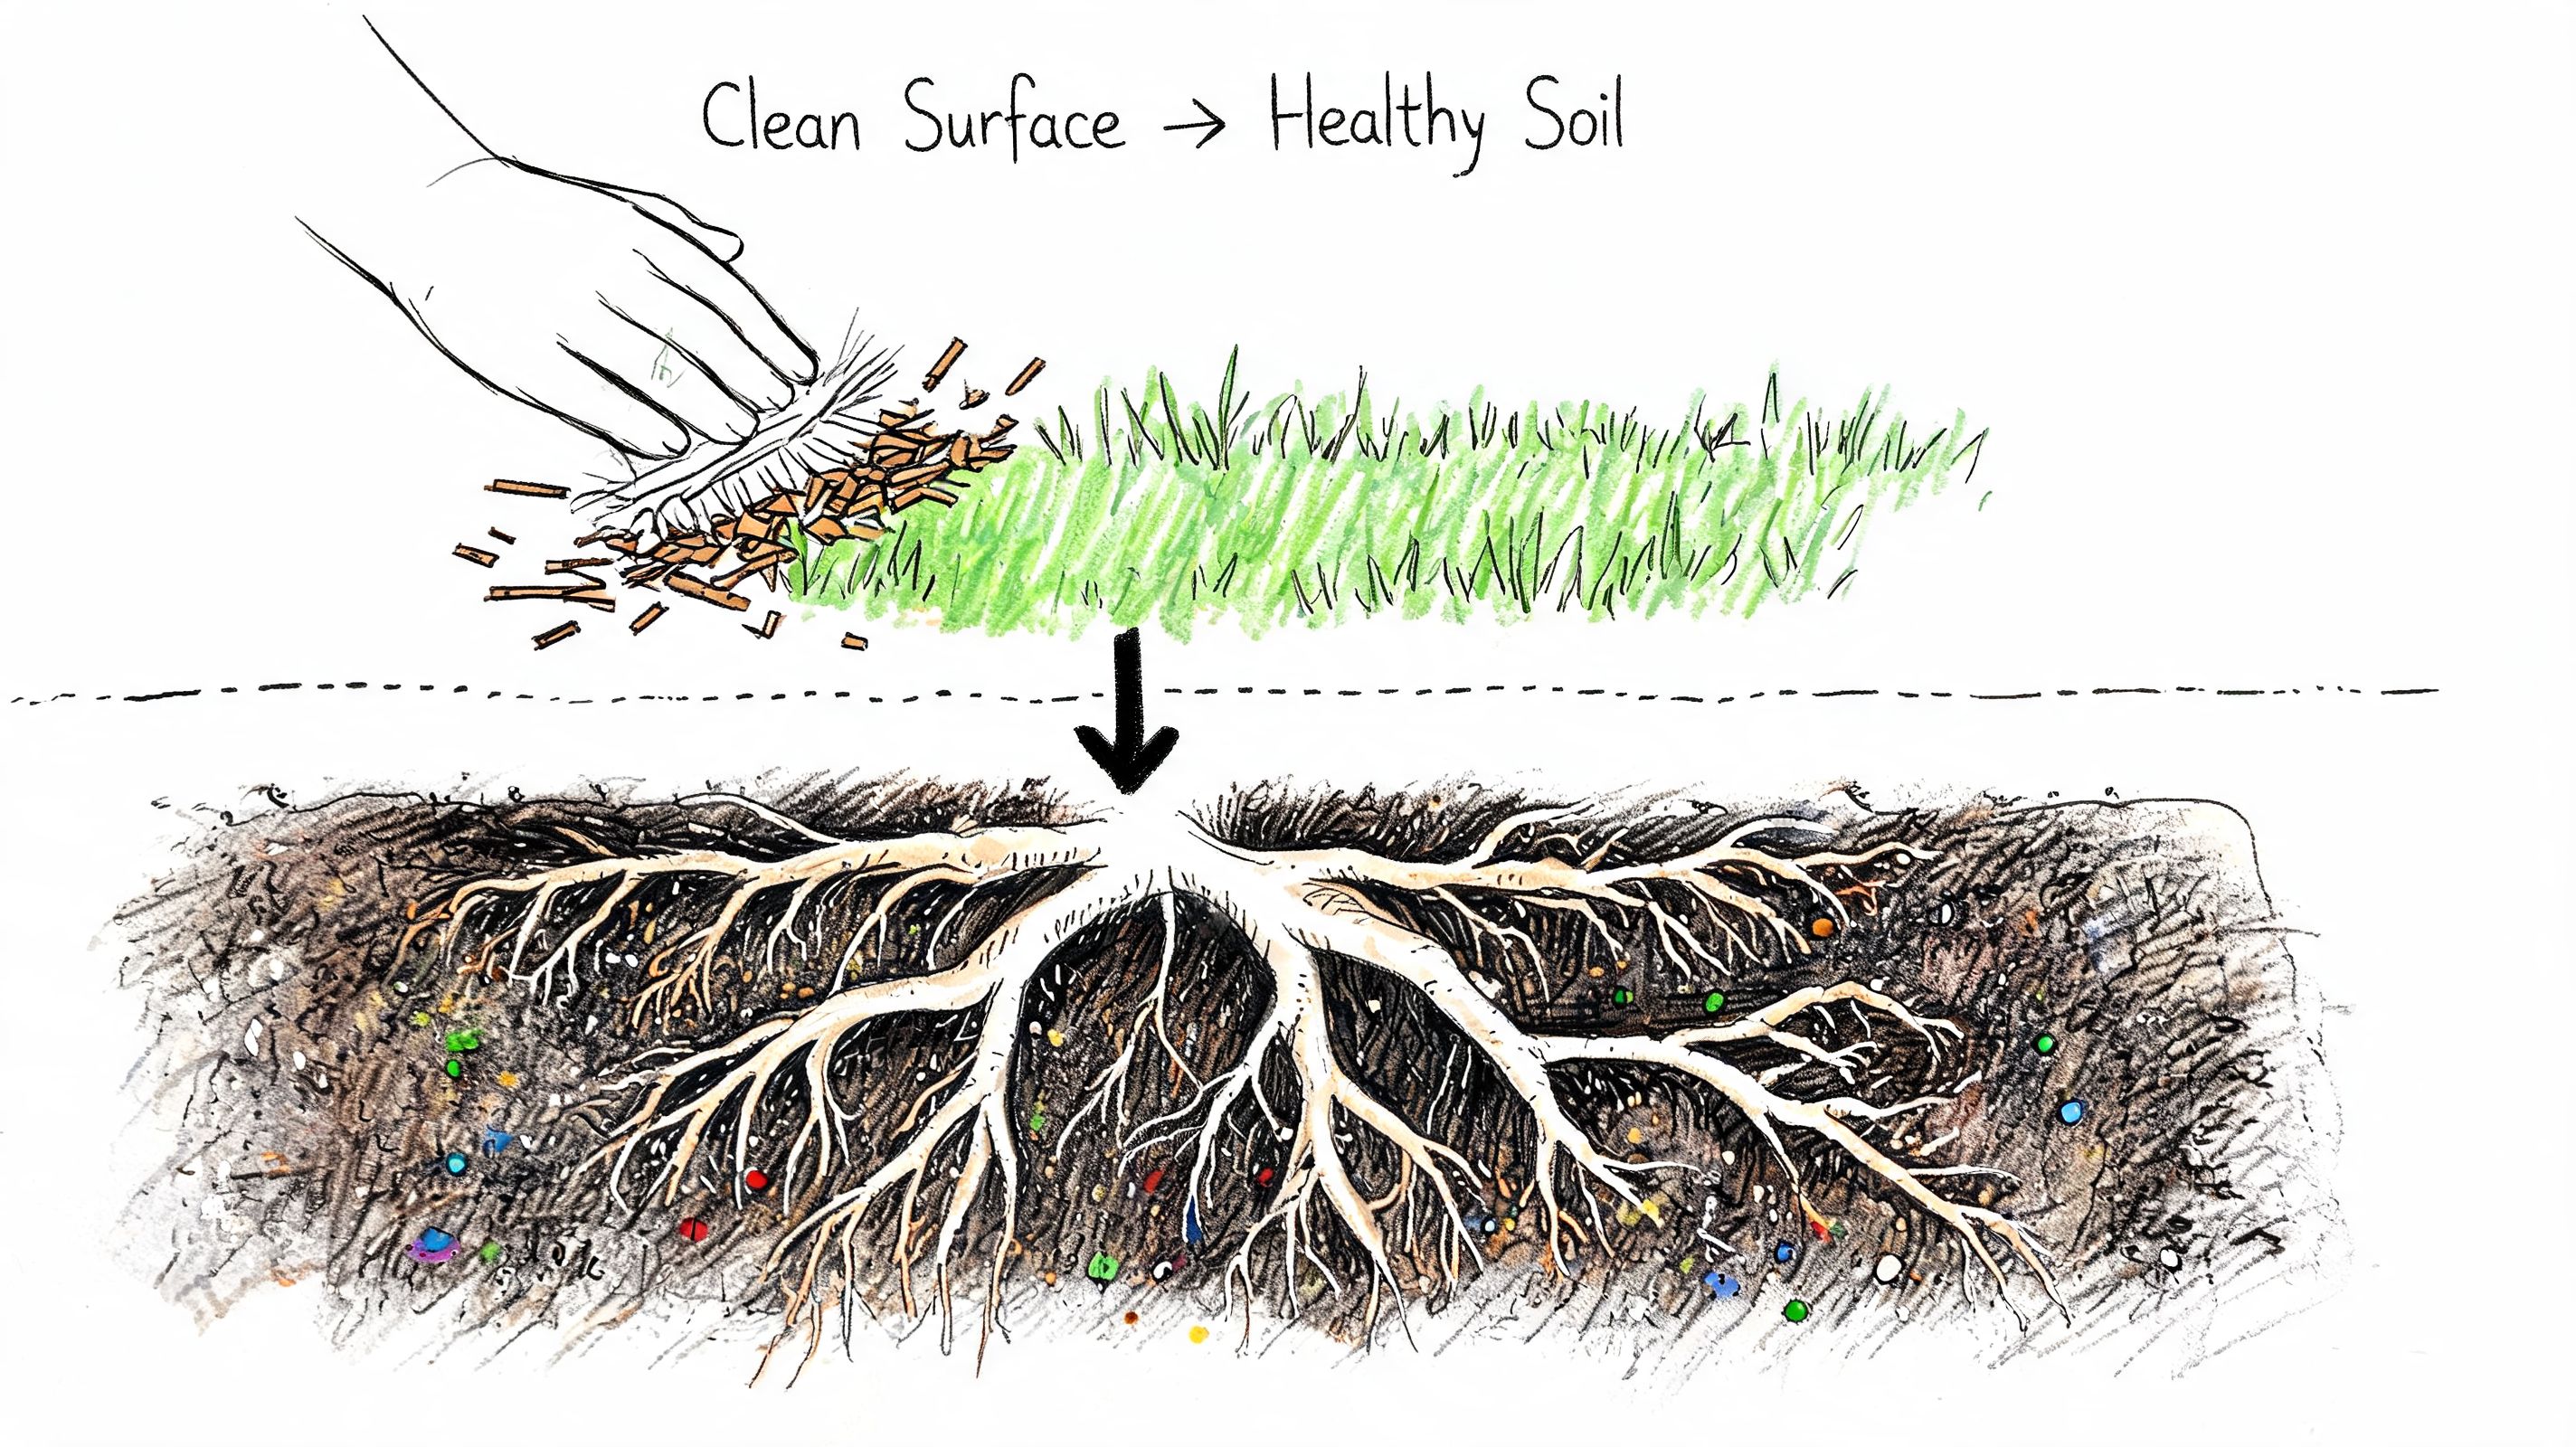
Cleanup first then test
A lot of homeowners test too early or fertilize blind.
That's backwards. If the lawn is still covered in thatch, leaves, or random debris, your sample can be less representative, and anything you apply afterward may not reach the soil the way you expect. Cleanup creates access. It clears the path for accurate sampling and better nutrient movement.
That matters because an estimated 70-80% of lawn issues, such as thinning and weed growth, stem from suboptimal pH or nutrient levels. Without a soil test after cleanup, fertilization remains pure guesswork, according to this lawn cleanup and soil testing article.
If you haven't tested before, start with a straightforward guide on where to get your soil tested. The key is simple. Clean first, sample second, feed third.
What your soil test should guide
A soil test gives you a reading on the parts that matter for decision-making:
- pH tells you whether the soil is too acidic or too alkaline for strong growth
- Nitrogen drives leaf growth and color
- Phosphorus supports roots
- Potassium helps with overall strength and stress tolerance
- Organic matter reflects how much decomposed material is in the soil
- CEC means cation exchange capacity, which is a measure of how well your soil holds nutrients
You do not need to memorize those terms. You do need to stop guessing.
Here's the practical point. If your lawn keeps getting weeds after cleanup, the answer might not be “use more weed killer.” If thin turf and poor density keep returning, the answer might not be “seed harder.” Weak soil conditions often let those visible problems keep coming back.
What matters most: Cleanup removes the surface mess. A soil test tells you what's wrong underneath.
A good sample comes from several spots across the lawn, mixed together, while avoiding unusual areas like pet spots, compost piles, or recently spilled fertilizer zones. The result gives you a baseline. Then you can make decisions that fit your lawn instead of following whatever is printed on a generic fertilizer bag.
Using MySoilPlan to Build Your Post-Cleanup Action Plan
Cleanup gives you a workable lawn surface. A soil test gives you the numbers. The next step is turning those numbers into a plan you'll follow.
That's where most DIY lawn care falls apart. Homeowners get a lab report, stare at pH and nutrient values, then either ignore it or buy the first fertilizer with a nice-looking bag.
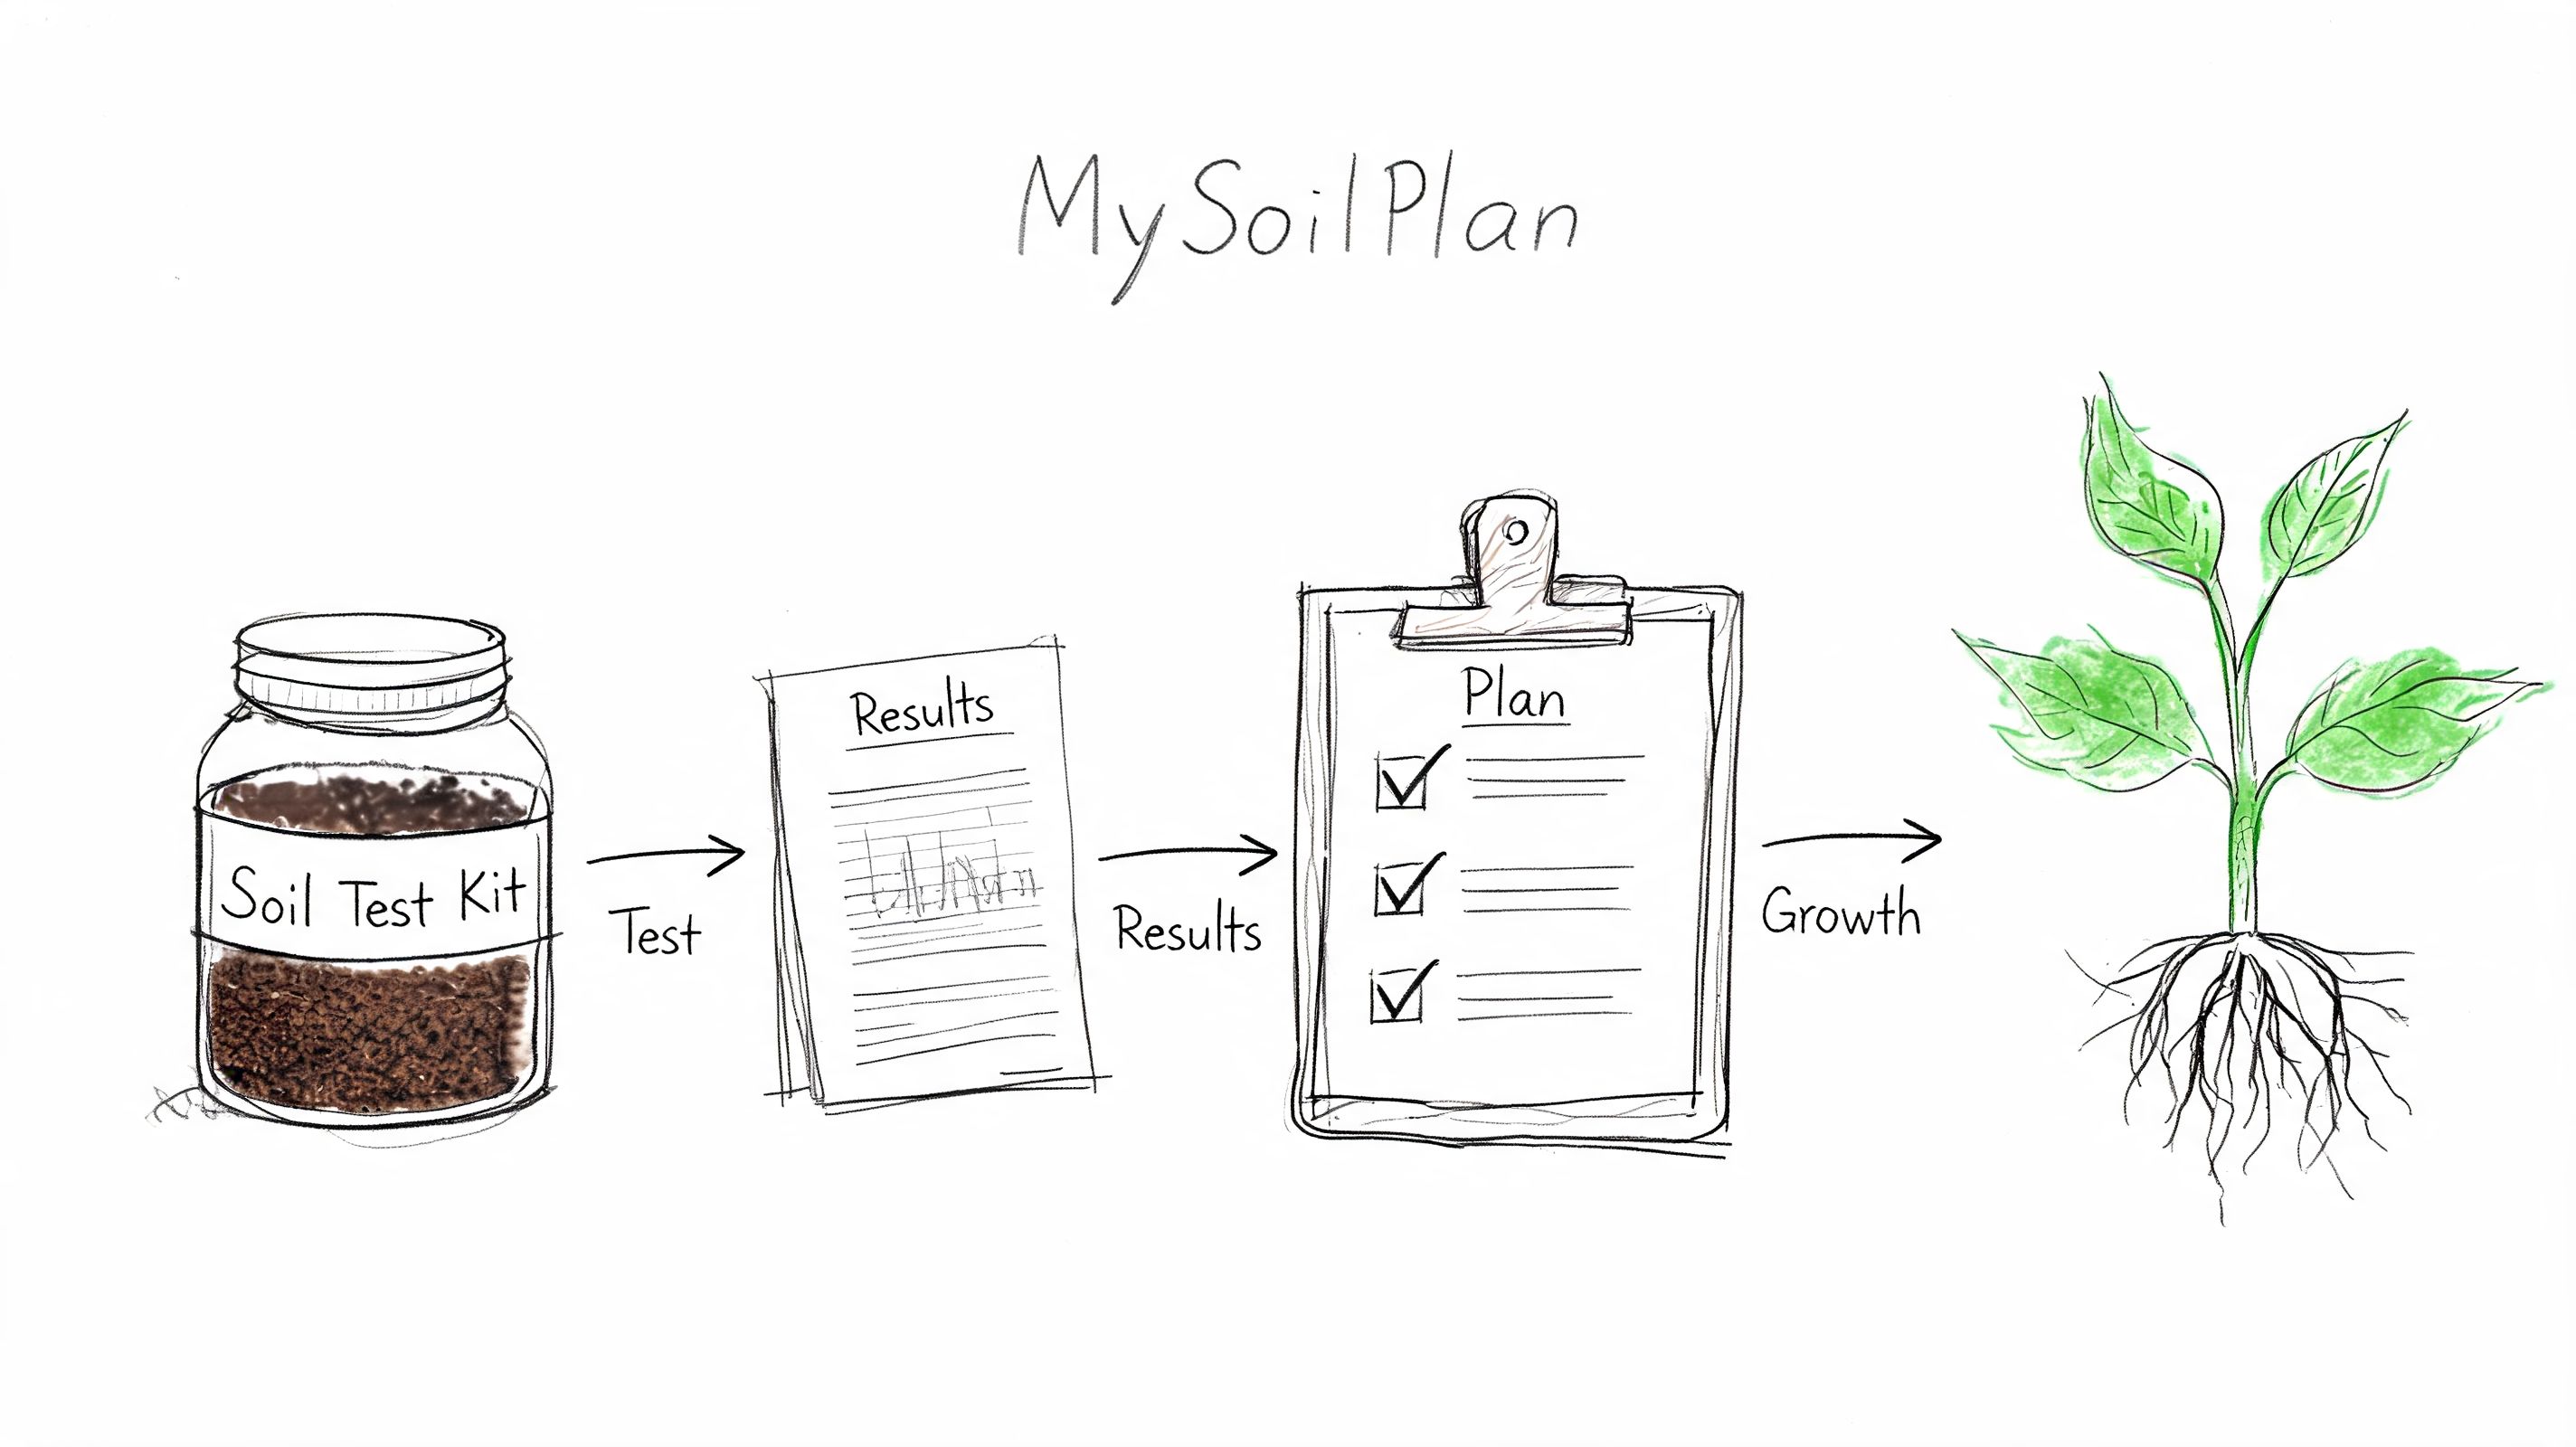
Turn lab numbers into a season plan
MySoilPlan is built for the exact moment after lawn clean up when you're asking, “What do I do next?”
You enter your soil test values, including pH, nitrogen, phosphorus, potassium, organic matter, CEC, and lawn size. Then the tool translates those results into a season-by-season fertilizer plan with clear nutrient targets and application timing.
That matters because the right plan is rarely “throw down one product and call it done.” Lawns usually do better with paced applications that fit spring, summer, early fall, and late fall conditions.
Here's the practical workflow:
-
Finish cleanup first
Remove debris, mow, dethatch if needed, and aerate if the lawn is compacted. -
Take a representative soil sample
Pull from multiple spots across the lawn and avoid oddball areas. -
Enter the lab values into the planner
Use the actual numbers from the report, not guesses. -
Review what needs to be raised, held, or avoided
With this, the guesswork stops. -
Choose products that fit the need
If phosphorus is already fine, don't keep applying products that add more phosphorus. -
Follow the schedule instead of improvising
Consistency beats random applications every time.
If you're getting ready for spring feeding, this guide to fertilizer for spring helps you think through product timing in a practical way.
A simple example of how to use the plan
Say your lab report shows the lawn is low in potassium and your pH is acceptable.
That tells you two things. First, the lawn probably doesn't need a random “all-purpose” fertilizer if the other nutrients are already in decent shape. Second, you should focus on a product that raises potassium without forcing extra nutrients the lawn doesn't need.
A useful planner should handle that by doing three jobs clearly:
- Calculate the amount based on your lawn size
- Adjust recommendations to match the fertilizer analysis you choose
- Spread the total need across realistic application windows instead of pushing too much at once
That last point is important. Split applications are usually easier on the lawn and easier for homeowners to manage. A good plan should tell you when to apply, how much to apply, and what to avoid.
Here's another example.
If your report shows pH is off, feeding alone won't solve the problem. You can dump nutrients on the lawn, but if pH is out of range, the grass may still struggle to use them well. In that case, the plan should flag pH correction as part of the priority list instead of pretending fertilizer is the full answer.
Don't treat every poor-looking lawn like it needs more nitrogen. That's one of the fastest ways to waste money and create surge growth without fixing the underlying issue.
Common mistakes after cleanup
Most post-cleanup mistakes are simple. They come from impatience.
Watch for these:
-
Applying fertilizer before finishing dethatching
If material is still sitting above the soil, nutrients may not get where they need to go. -
Using one bag for every problem
Lawns don't all need the same nutrient mix. -
Ignoring square footage
Product rates only make sense when you know the area you're treating. -
Skipping follow-through
One application rarely fixes a season-long problem. -
Chasing color instead of soil balance
Dark green grass can still be weak if the nutrient profile is off.
The best post-cleanup plan is boring in the right way. It's measured. It's scheduled. It's tied to actual soil conditions.
If your yard is finally clean, don't waste that reset with guesswork. Test the soil, build a plan, and apply only what the lawn needs.