Lawn Fertilizer Spreader Settings: A How-To Guide
You've probably stood in the yard with a fertilizer bag in one hand and a spreader in the other, staring at the dial like it should somehow explain itself. The bag gives you a number. The spreader gives you a different scale. And none of it feels certain enough when the downside is wasted product, stripes across the lawn, or burned grass.
That confusion is normal. Lawn fertilizer spreader settings are not universal, and the biggest mistake homeowners make is treating the printed setting like a guaranteed answer. It isn't.
The good news is that this is fixable. Once you know how to match your soil needs, your fertilizer analysis, and your spreader output, the whole process gets much simpler. You stop guessing and start applying the right amount on purpose.
Table of Contents
- The Spreader Setting Guessing Game
- Why You Can't Trust the Bag Settings
- How to Calculate Your Real Application Rate
- How to Calibrate Your Spreader The Right Way
- Common Spreader Problems and Quick Fixes
- Your Spreader Setting Questions Answered
The Spreader Setting Guessing Game
A common first try goes like this. A homeowner buys fertilizer, finds a suggested spreader number on the label, fills the hopper, and starts walking. Halfway through the lawn, one of two things happens. Either the hopper empties too early, or there's too much left at the end.
That's the moment people realize the dial isn't a recipe. It's a starting point.
A foundational rule is that fertilizer rates are usually expressed per 1,000 square feet, not as a single universal spreader number. Some products are pre-matched to certain spreaders. For example, one common reference point is a setting of 6 on a specific drop spreader to apply 2.8 pounds per 1,000 square feet, but that same guidance also warns that the setting is only an approximate starting point because walking speed and spreader condition change the actual output, as explained in this spreader settings reference.
Why the dial feels random
The spreader dial feels arbitrary because, by itself, it is.
Two people can use the same model spreader on the same setting and still apply different amounts. One walks faster. One has a spreader with worn parts. One fertilizer flows freely. Another product hangs up in the hopper and drops unevenly.
Practical rule: The right setting is the one that delivers the rate you need on your lawn. Not the one printed on the bag.
What actually works
The reliable approach is simple:
- Know your target rate: Figure out how much product you want to apply per 1,000 square feet.
- Use the bag number as a starting point: It helps you avoid starting wildly high or low.
- Verify with a calibration test: If the spreader doesn't deliver the right amount, change the setting.
That little bit of prep saves a lot of trouble. Most lawn problems tied to fertilizer aren't caused by the fertilizer itself. They're caused by uneven application.
Why You Can't Trust the Bag Settings
Bag settings are useful, but they're not precise enough to trust blindly.
The biggest reason is that the spreader dial number only describes the opening on that spreader. It does not guarantee how much product leaves the hopper while you walk. Real application depends on how fast you move, how smoothly the product feeds, and how your machine throws or drops material.
One number can mean very different things
A good example is how widely settings vary by product. A spreader might need a setting of 11.5 to apply 12.8 pounds per 1,000 square feet for one fertilizer, but only around 4.5 to 5.5 for products applied at 4 to 5 pounds per 1,000 square feet, as shown in these product-specific spreader setting examples.
That's a big difference, and it tells you something important. The dial number is tied to the product, not just the spreader.
The variables that throw off bag settings
Here are the factors that make recommended lawn fertilizer spreader settings drift in real life:
- Your walking pace: Faster walking usually means less product per area. Slower walking can pile on too much.
- Product size and density: Small, heavy granules flow differently than large, light ones.
- Spreader wear: A spreader that has seen a few seasons may not behave like a new one.
- Moisture and weather: Damp product can bridge or clump. Wind can push broadcast material off pattern.
- Pattern differences: A broadcast spreader throws a swath. A drop spreader places product straight down. They don't behave the same.
A homeowner often sees a dial setting and assumes it works like an oven temperature. Set it and trust it. Fertilizer spreaders don't work that way.
If your neighbor says, “I always use setting 5,” that tells you almost nothing unless they're using the same spreader, the same product, and the same pace.
Why calibration is worth the effort
Calibration takes a little time up front, but it prevents two expensive mistakes.
First, under-application. The lawn stays pale, the feeding looks weak, and you assume the fertilizer “didn't work.” Second, over-application. That can lead to streaks, wasted product, and stressed turf.
When homeowners skip calibration, they usually don't notice the problem until after the grass reacts. By then, the application is already done.
How to Calculate Your Real Application Rate
The spreader comes after the math. Start with what the lawn needs.
That's where many fertilizer guides fall short. They jump straight to spreader charts and skip the better question: How much of this nutrient should go on the lawn at all? Generic bag-rate advice doesn't account for whether your soil needs a nutrient like phosphorus, and planning from soil needs helps prevent waste and environmental risk, as noted in this discussion of spreader settings and nutrient planning.
Start with the nutrient, not the bag
A fertilizer label usually shows three numbers. That's the N-P-K analysis.
- N means nitrogen
- P means phosphorus
- K means potassium
In plain terms, those numbers tell you the share of each nutrient in the bag. If a fertilizer is 24-0-6, that means it contains nitrogen and potassium, with no phosphorus listed in that analysis.
That matters because your soil test may say one nutrient is needed and another should be avoided. If phosphorus is already sufficient, using a product just because the bag setting is easy is the wrong move.
One option homeowners use for this planning step is MySoilPlan, which turns soil test numbers and lawn size into a fertilizer schedule with product-aware application rates. You can also do the math by hand, and it's not hard once you see it once.
How to do the math
Use this simple idea:
Product needed = nutrient goal ÷ nutrient percentage in decimal form
If your goal is 1 pound of nitrogen per 1,000 square feet, and your fertilizer is 24-0-6, then the nitrogen percentage is 24%, or 0.24 as a decimal.
So the calculation is:
1 ÷ 0.24 = 4.17 pounds of product per 1,000 square feet
That means you're not applying “1 pound of fertilizer.” You're applying about 4.17 pounds of that fertilizer product to deliver 1 pound of actual nitrogen.
Example table
| Step | Description | Example (Goal: 1 lb of Nitrogen) | Your Calculation |
|---|---|---|---|
| 1 | Identify the nutrient goal from your plan or soil test | 1 lb N per 1,000 sq ft | |
| 2 | Read the fertilizer analysis | 24-0-6 | |
| 3 | Convert the nutrient percentage to a decimal | 24% = 0.24 | |
| 4 | Divide the goal by the decimal | 1 ÷ 0.24 = 4.17 | |
| 5 | Result | Apply 4.17 lbs of product per 1,000 sq ft |
A practical example for a real lawn
Say your front lawn is 1,000 square feet and your plan calls for 1 pound of nitrogen. You bought a 24-0-6 fertilizer.
You would measure out about 4.17 pounds of product for that 1,000 square foot area. That is the amount your spreader needs to deliver across that space.
The spreader setting is not the target. The product weight over a known area is the target.
If your lawn area is larger, multiply the product amount by the number of thousand-square-foot units in your yard. If the lawn is smaller, scale it down.
Why this step matters
This is what keeps fertilizer use tied to lawn need instead of bag marketing.
It also helps you avoid a common homeowner mistake. They buy a product with nutrients the lawn doesn't need, then try to solve everything by changing the dial setting. The dial can only change how much goes out. It can't fix a poor product choice.
How to Calibrate Your Spreader The Right Way
After determining the pounds of product needed per 1,000 square feet, calibration becomes straightforward. You are adjusting the spreader until it distributes that amount over a known area.
This is the part that builds confidence. You stop hoping the dial is right and start proving it.
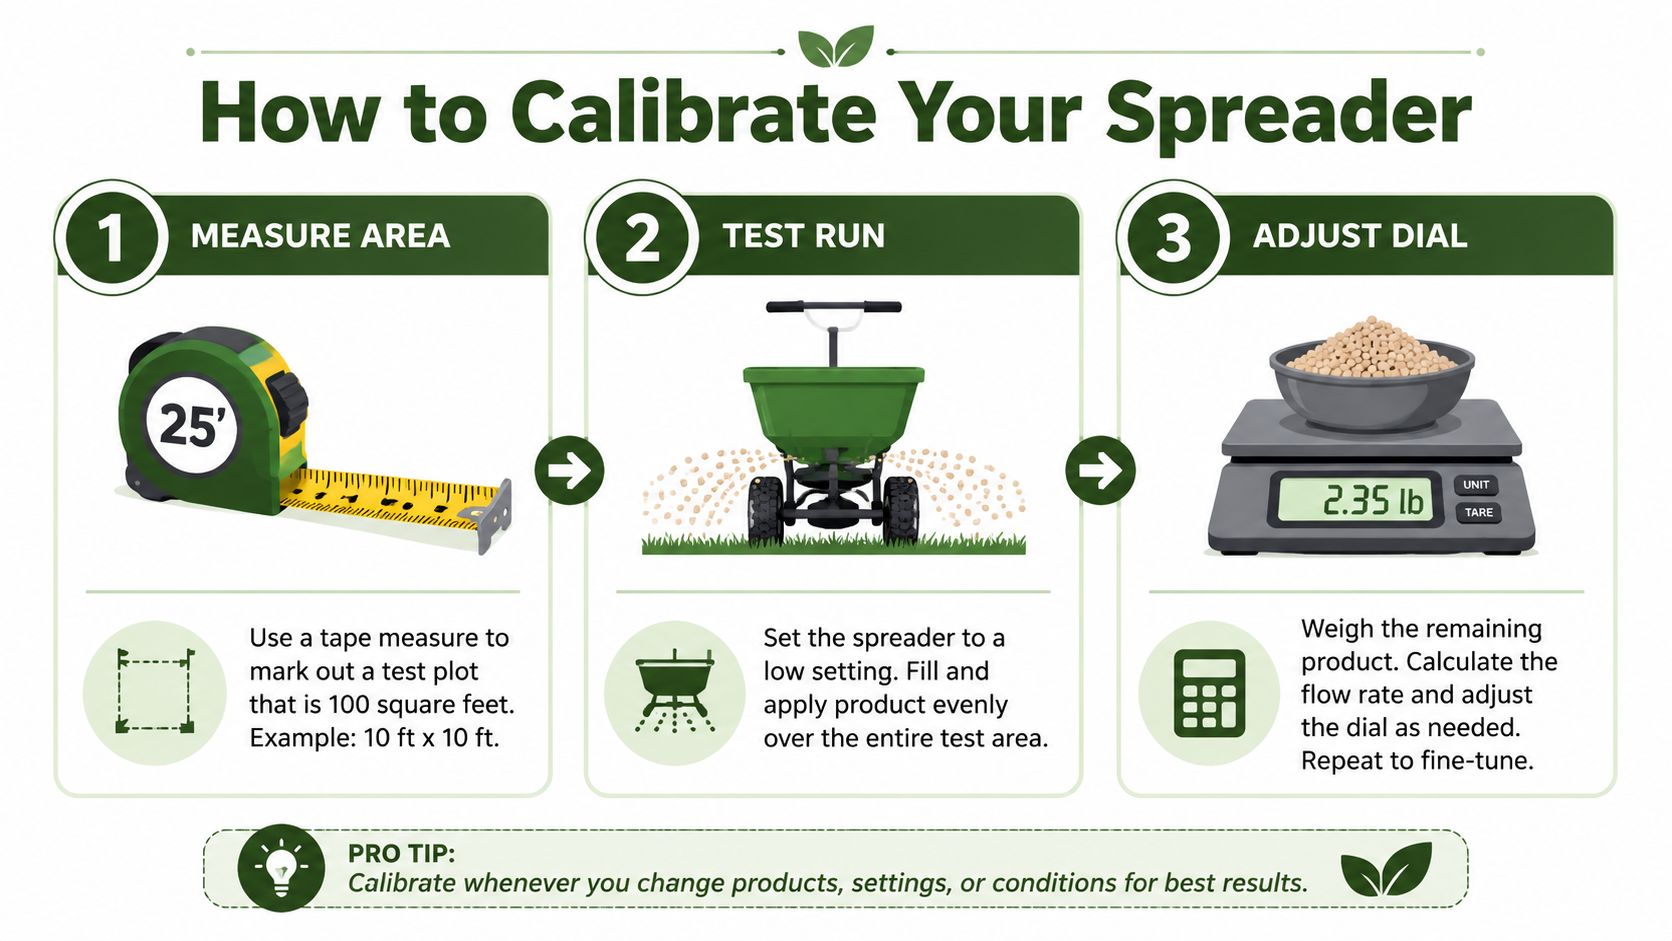
A proven calibration workflow is to run a test, weigh the output, and adjust the opening. If the spreader delivers too little, increase the hopper opening. If it delivers too much, reduce it and test again. For rotary spreaders, making two perpendicular passes at a half-rate helps mask small errors and reduce striping, as described in this calibration guide from Penn State Extension.
The area run method
This is the easiest calibration method for most homeowners. It works with any spreader.
Step 1
Measure a test area you can identify clearly. A section of driveway, pavement, tarp, or marked lawn area works well if you can collect or account for the product cleanly.
A small measured area keeps mistakes cheap. You're testing the machine, not feeding the whole yard yet.
Step 2
Weigh or measure out the amount of fertilizer that should cover that test area based on your target rate.
If you already know the amount needed per 1,000 square feet, scale that amount to match your test area. The point is simple: you want to know exactly how much should be used in that measured space.
Step 3
Set the spreader on a conservative opening. Start lower rather than higher.
Walk the test area at your normal pace. Don't rush. Don't creep. Walk the same way you plan to walk on the lawn.
Step 4
Check what happened.
- Too much left in the hopper: Open the setting a bit more.
- Ran out too early: Close the setting down.
- Close to the target amount: Repeat once more to confirm.
This is not a one-pass magic trick. It's an adjustment process.
The catch test for broadcast spreaders
Broadcast spreaders add one more challenge. You also need to know the effective swath width, which means the usable width of the spread pattern.
A broadcast spreader may throw product wide, but the full pattern is not evenly distributed from edge to edge. The center is usually heavier, and the edges taper off.
How to find the effective swath
Set out catch pans or similar containers across the spread pattern.
Then make a pass and compare what lands in the center versus the sides. A useful rule from the extension method is to identify where the side pans receive about half of what the center pan receives. That distance becomes the effective swath width.
If your effective swath is 16 feet, your passes should be spaced 16 feet apart.
A broadcast spreader's advertised throw distance is less useful than its effective swath. That's the spacing that keeps overlap even.
The pass pattern that hides small errors
For rotary or broadcast spreaders, one of the best habits is to apply at half-rate and make two passes in perpendicular directions.
That means:
- Cut your target product amount in half for the first pass.
- Walk one direction across the lawn.
- Apply the second half at a right angle to the first pattern.
This method helps smooth out minor skips and overlaps. It's especially useful on lawns where straight lines are hard to judge.
What to do for drop spreaders
Drop spreaders are simpler because they place product directly below the hopper. You don't need to solve for a wide throw pattern.
You do need to be disciplined about your path. If you leave gaps between passes, you'll get narrow hungry strips. If you overlap too much, you'll double-feed rows.
For a drop spreader:
- Mark a straight path: Use the driveway edge, sidewalk, or a visual line in the turf.
- Keep wheel spacing consistent: Let each pass line up cleanly with the previous one.
- Shut the hopper when turning: Turns are where accidental piles happen.
A beginner workflow that works
If you're calibrating for the first time, keep it simple:
- Measure one test area
- Calculate the product amount for that area
- Start with a low setting
- Walk at your normal pace
- Adjust up or down
- Repeat until the output matches the target
- Apply to the lawn using the same pace and pattern
That's the whole system. Once you do it once, lawn fertilizer spreader settings stop feeling mysterious.
Common Spreader Problems and Quick Fixes
Most spreader problems aren't complicated. They usually come down to pattern, maintenance, or rushing.
Striping
You finish the job, water it in, and later the lawn shows light and dark bands.
That usually means poor overlap or inconsistent walking lines. With a broadcast spreader, the fix is better pass spacing and the half-rate crosshatch method covered above. With a drop spreader, the fix is straighter runs and cleaner edge-to-edge coverage.
Clogs and uneven flow
You hear the spreader running, but the product isn't feeding smoothly. Then a small shake sends too much out at once.
The usual causes are damp fertilizer, buildup in the hopper, or neglected moving parts. Empty the spreader after use, clean it, and store both spreader and product dry. Before applying, break up any clumps and spin the wheels briefly to make sure the mechanism moves freely.
A clean spreader gives more consistent results than a dirty one with a “correct” dial setting.
Spills and leftover product
Sooner or later, everyone dumps a little too much in one spot. Don't leave it there.
If you spill fertilizer on the lawn, scoop up as much as you can right away. Spread the recovered product evenly elsewhere if it's still clean and dry enough to use. If a heavy concentration stays in one patch, that spot is much more likely to burn.
Leftover product is simpler. If it's dry and in good condition, store it sealed and out of moisture. But don't assume the same spreader setting will work next time unless you calibrate again for that exact product and pace.
Your Spreader Setting Questions Answered
What if my spreader model isn't listed on the bag
Use the listed setting as a rough comparison point only if your spreader is similar in type. Then calibrate. If you skip that step, you're still guessing.
How much does walking speed matter
A lot. If you walk faster, the spreader usually applies less product over the same area. If you slow down, it applies more. The fix isn't to obsess over perfect speed. It's to calibrate using the same normal pace you'll use on the lawn.
Can I use one setting for every fertilizer
No. Different products flow differently, and some are meant to be applied much heavier than others. Lawn fertilizer spreader settings depend on both the product rate and how the granules behave in your spreader.
How often should I calibrate
Calibrate whenever you switch products, whenever the spreader starts acting differently, or whenever you haven't used it in a while. A machine that worked fine last season may not deliver the same output now.
Is the bag rate always wrong
Not always. It can be a reasonable starting point. The problem is treating it like a guarantee.
What should I do first before I fertilize
Do these in order:
- Measure your lawn area
- Read your soil test or nutrient plan
- Choose a fertilizer that matches the need
- Calculate how many pounds of product to apply
- Calibrate the spreader
- Apply with a consistent pattern
That order matters. If you start with the dial, you're skipping the part that determines whether the application is correct.
A good lawn feeding routine is simple when you break it down. Match the fertilizer to the lawn's need. Calculate the actual product rate. Calibrate the spreader to deliver that amount. Then walk a clean pattern and let the numbers, not the bag guess, guide the job.
If you want better results from lawn fertilizer spreader settings, don't chase the perfect dial number. Chase the correct application rate over a known area. That's what keeps the lawn even, avoids waste, and gives you a process you can trust every time.